
How do I onboard? #
- Sign into the Raise App at https://app.raise.team.
- On the dashboard, click the blue button on the right that says Start.
Complete your profile #
- Complete the information on the profile:
- Your Organization’s legal name;
- Your district (if applicable);
- Your first and last name (as the Organization Contact);
- Your work email address;
- Your phone number;
- Your organization’s address and phone number.
Click the Pay Option toggle if applicable #
- If Raise will be paying your test center directly, turn on the toggle next to My business will be reimbursed.
- If Raise will not be paying your test center directly, leave this toggle unchecked.
- Click Save & Next.
Please see the instructions below (linked here) if Raise will be paying your facility directly.
Complete and sign the Agreement #
- Read through the Agreement.
- At the end of the Agreement, click Yes, I Agree.
- Click Continue to Sign.
- In the pop-up signature box, use your mouse to draw your signature.
- Click the button labeled Sign & Complete.
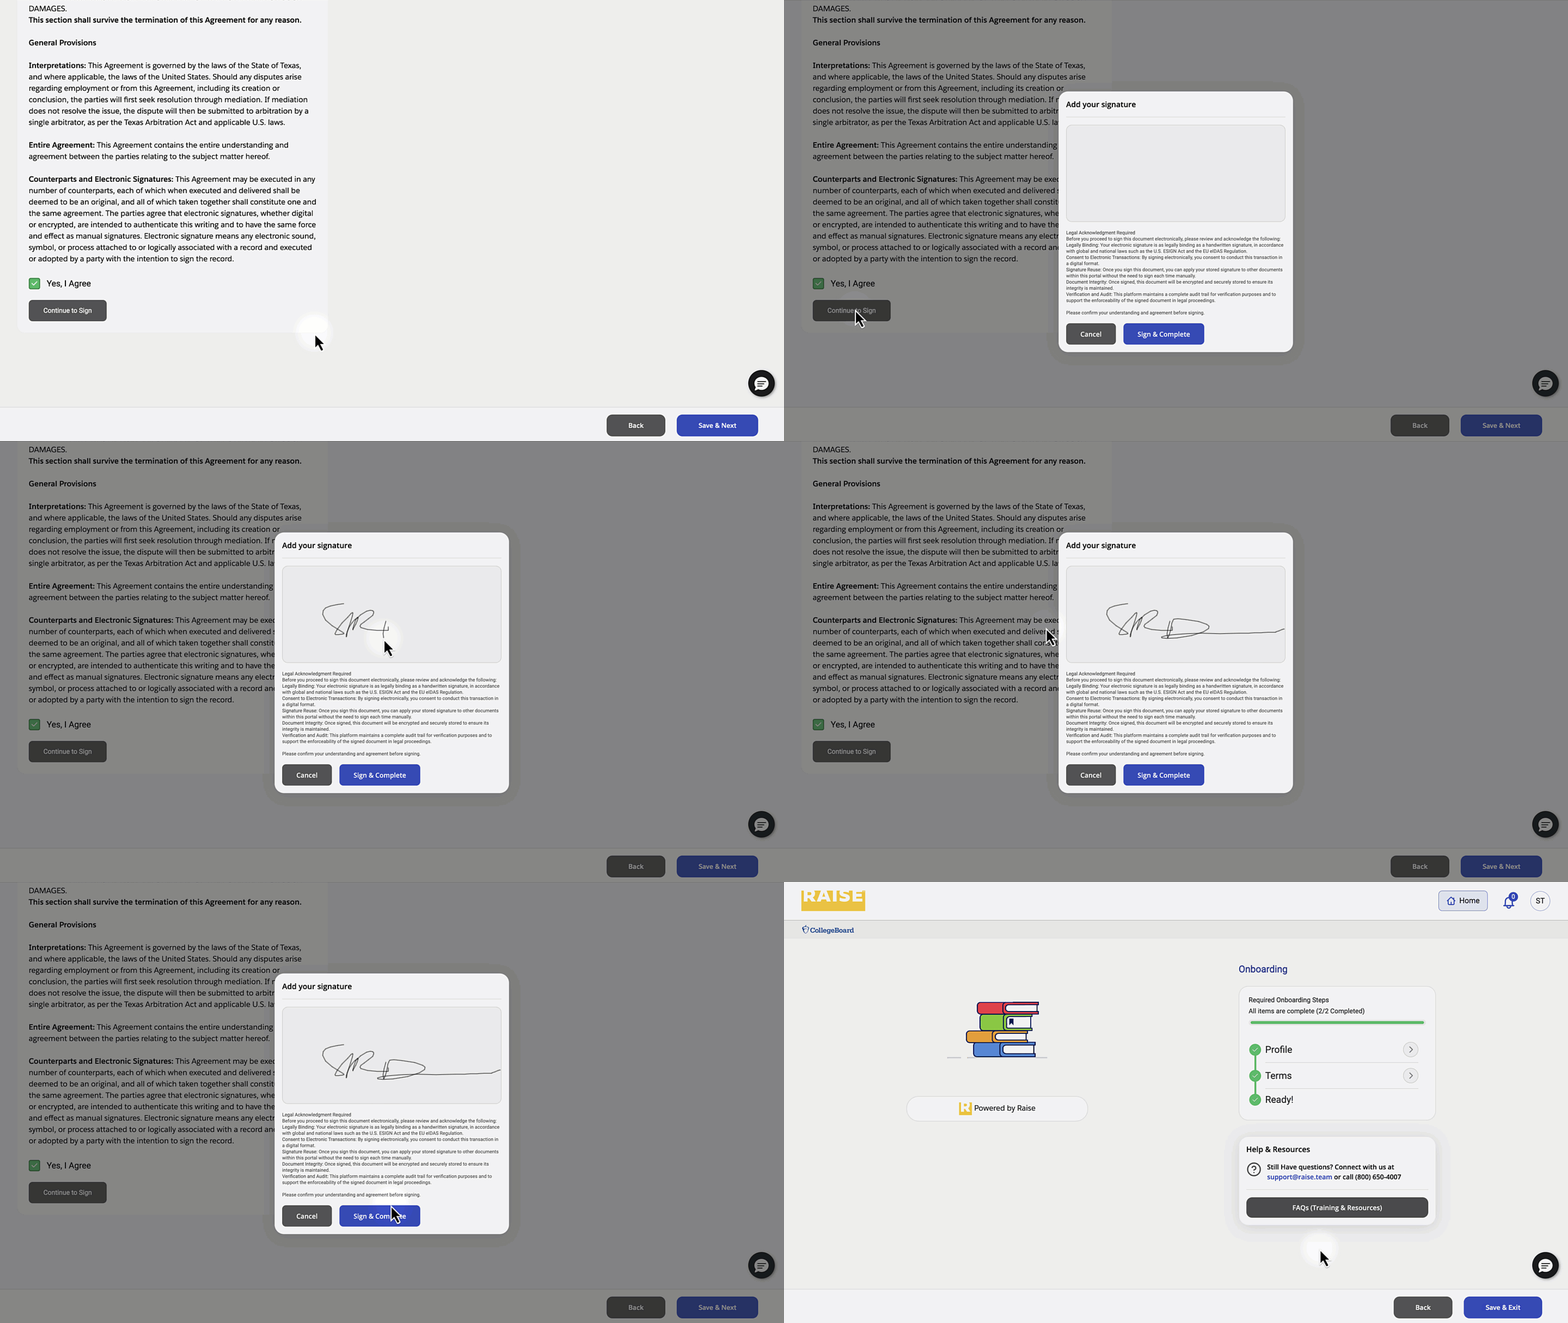
- Your onboarding is complete. Click Save & Exit to return to the dashboard.
How to submit an invoice if Raise is not paying your facility directly #
- On the Dashboard, use the dropdown menu to select your test administration.
- Click Add.
- Click the green Submit Voucher button.
- On the voucher screen, enter the number of Test Takers at this administration, and the number of Total Testing Rooms.
Attach an official invoice on letterhead #
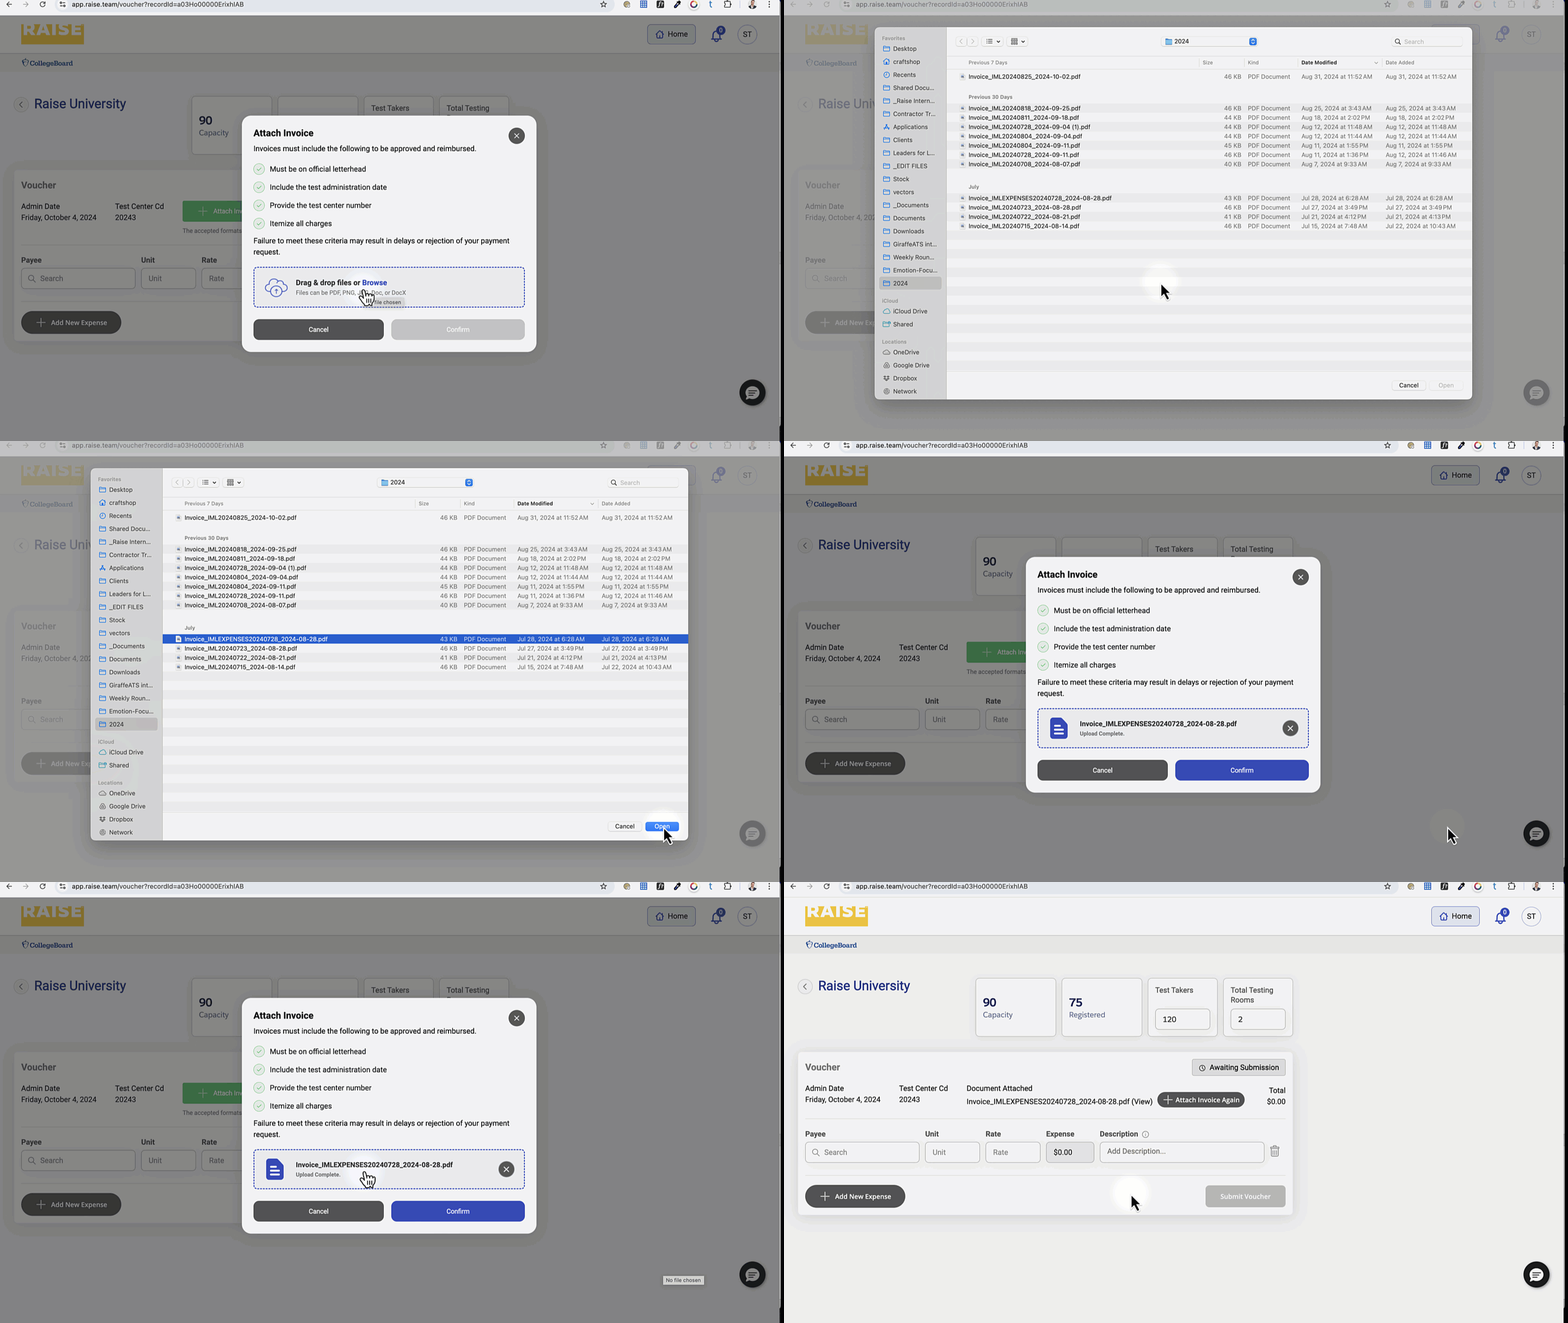
- Click the green button labeled Attach Invoice.
- Your official invoice must be saved as a PDF, Word Document (DOC, DOCX), PNG or JPG file.
- The official invoice must be on your organization’s letterhead and include:
- The test administration date;
- Your test center number;
- All the charges itemized.
- Drag and drop your official invoice on letterhead into the space indicated on the screen, or click Browse to select a file from your computer.
- Click Confirm.
Enter your itemized expenses on the voucher #
- Your itemized expenses on the voucher should match the itemized expenses on the official invoice file you attached.
Select your payee and add their expense #
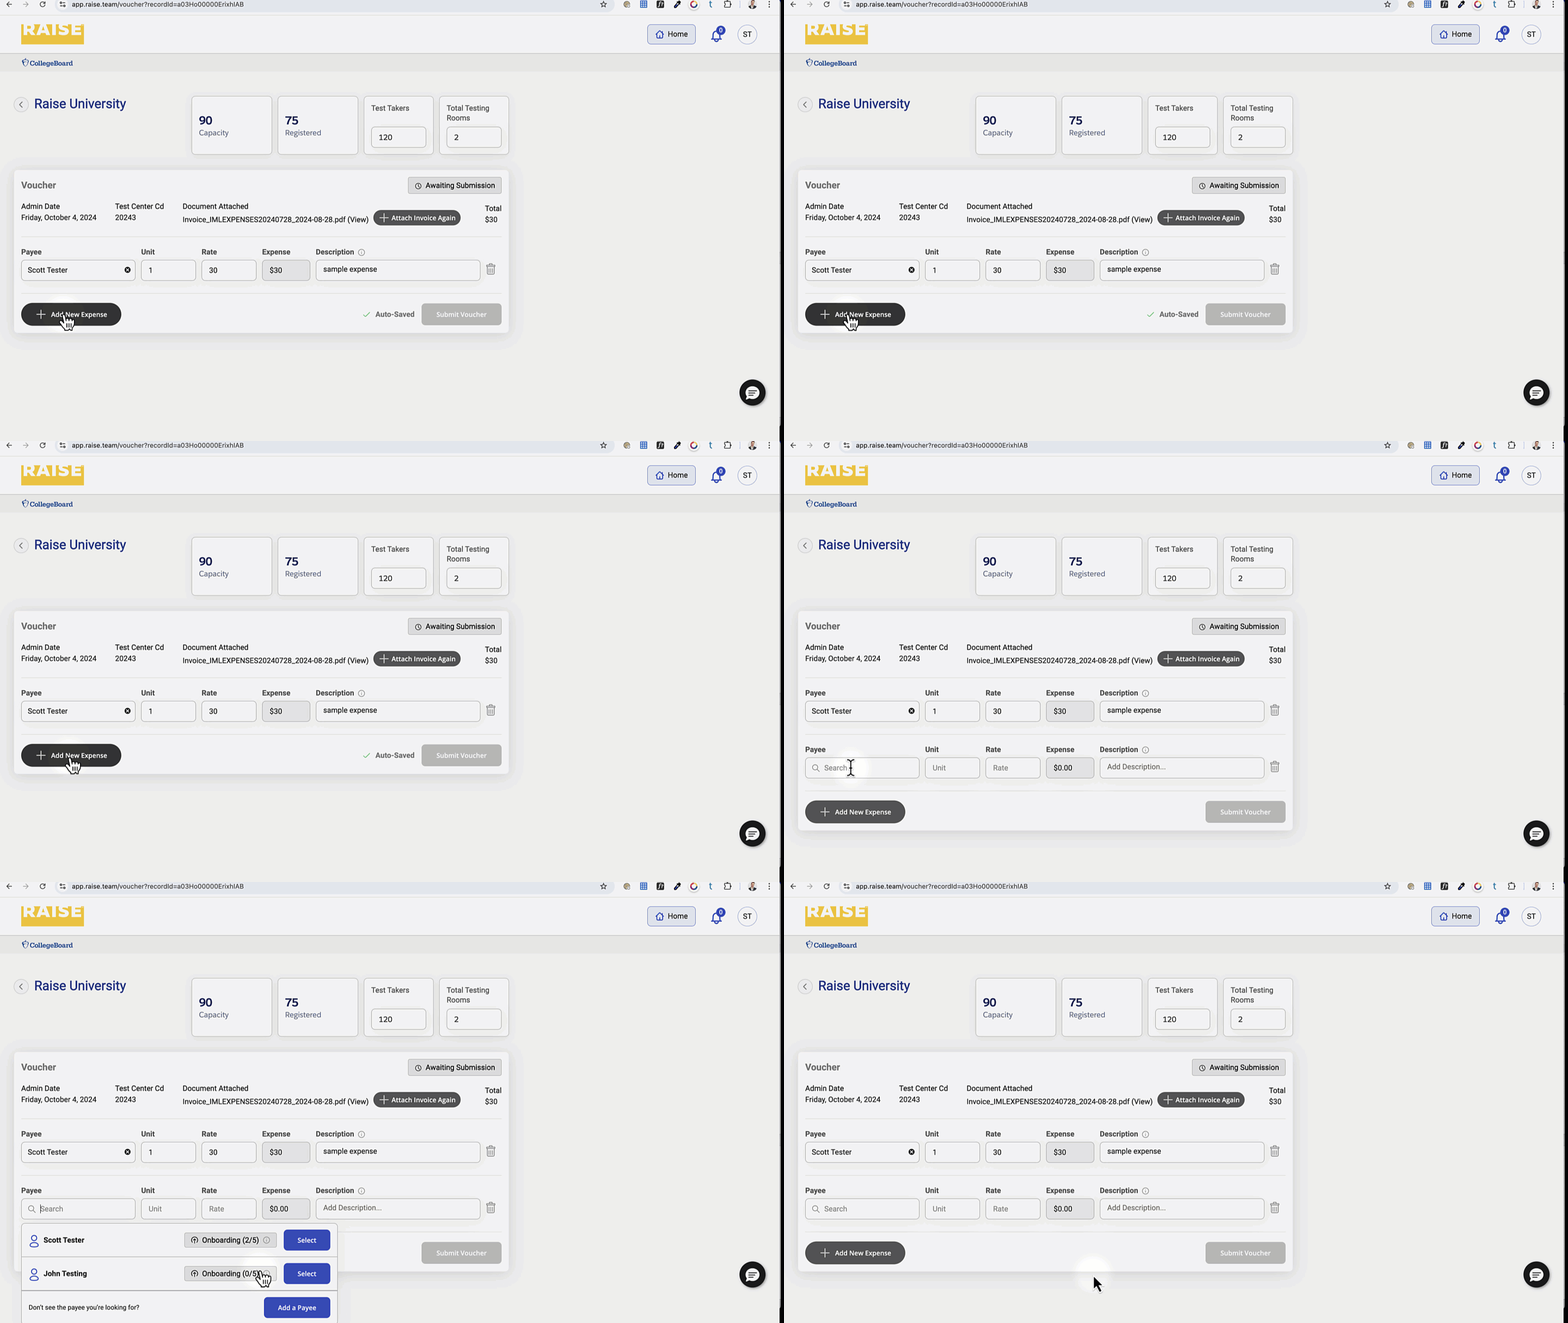
- Click the Payee box.
- You can see all the Payees who have begun or completed their onboarding.
- Select your payee from the list, click Add.
- Enter the number of Units.
- Enter the Rate.
- Enter the Description of the expense.
- If you need to add more Payees, click Add New Expense. Repeat the process for your new payee.
Review the instructions below if you don’t see your Payee on the list, and need to add them to your voucher.
How do I add a Payee to my voucher? #
- Click the Payee box.
- If your Payee is not listed, click the button labeled Add a Payee.
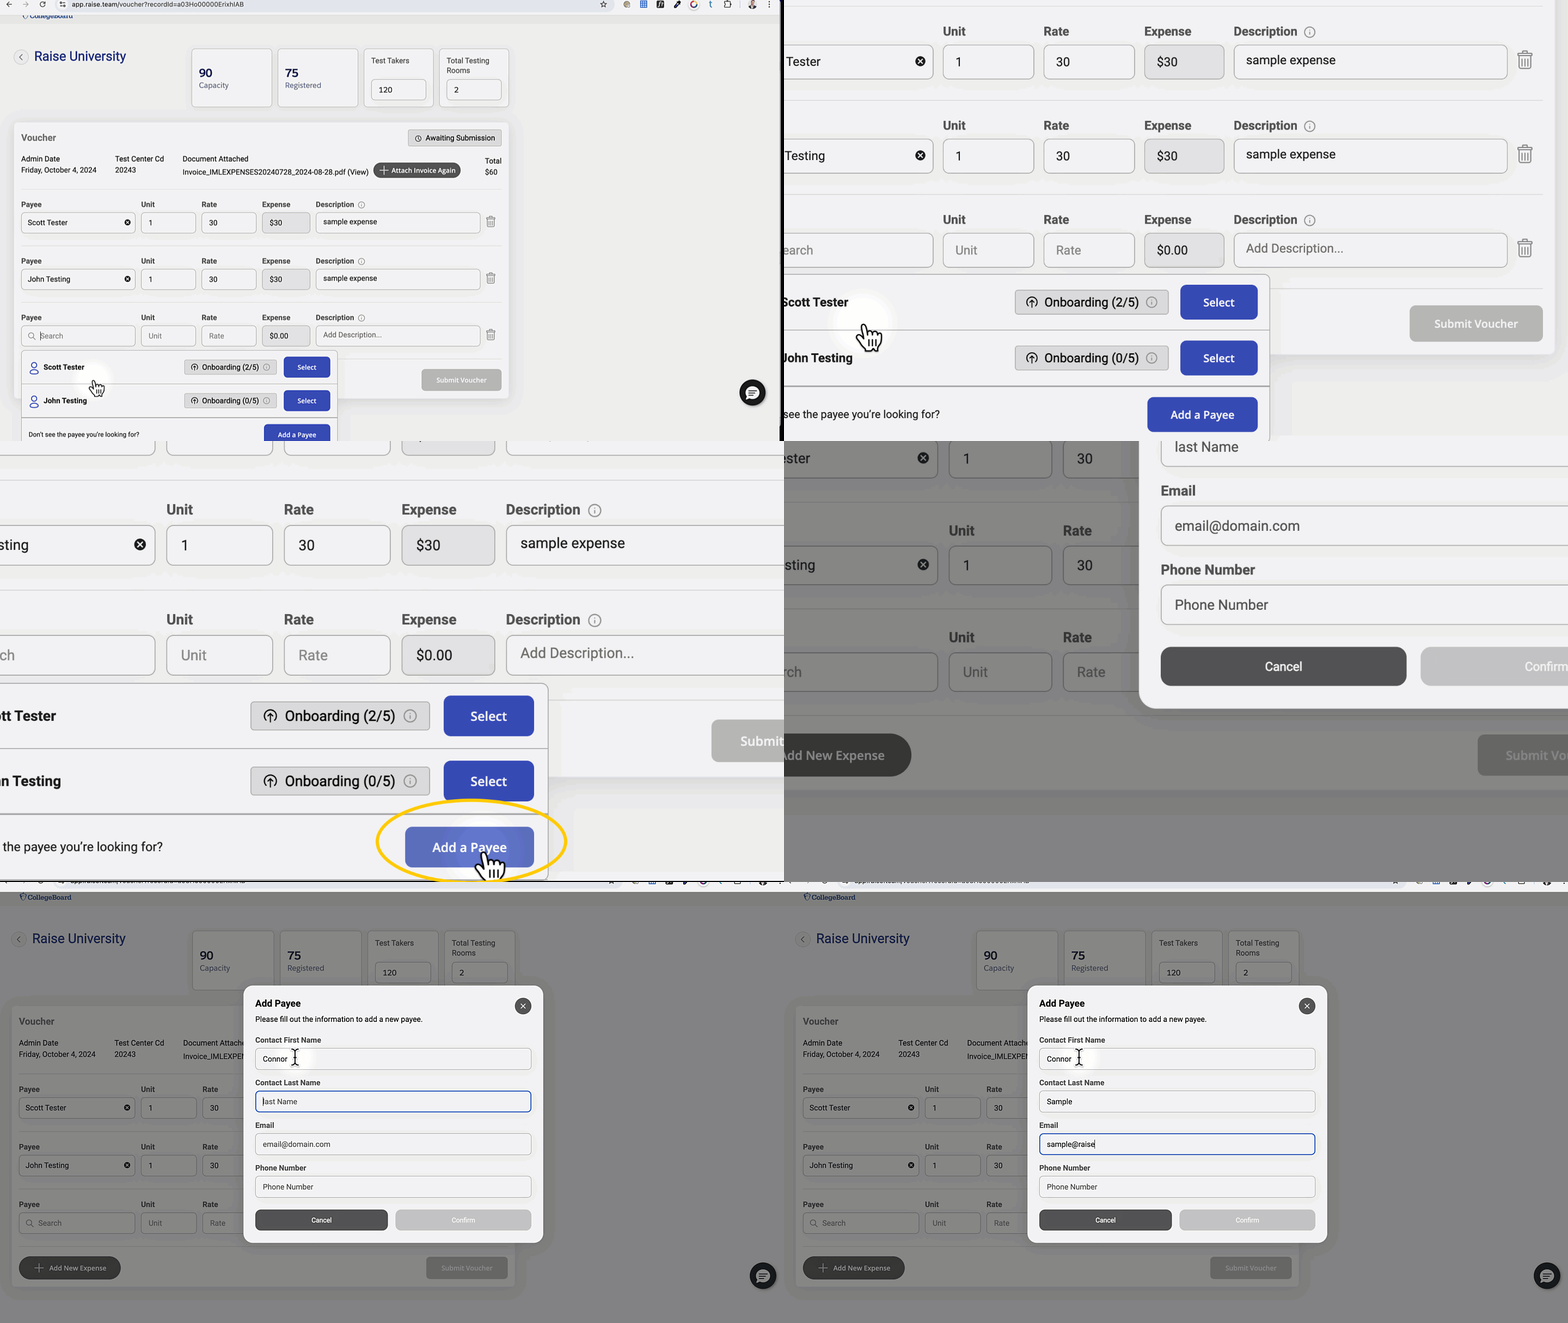
- Enter their information in the pop-up box:
- Their first name;
- Their last name;
- Their work email address;
- Their phone number.
- Click Confirm.
- Your Payee will be sent an email with instructions for them to start their onboarding.
- You can now select this Payee from the list, and click Add.
- Enter the number of Units.
- Enter the Rate.
- Enter the Description of the expense.
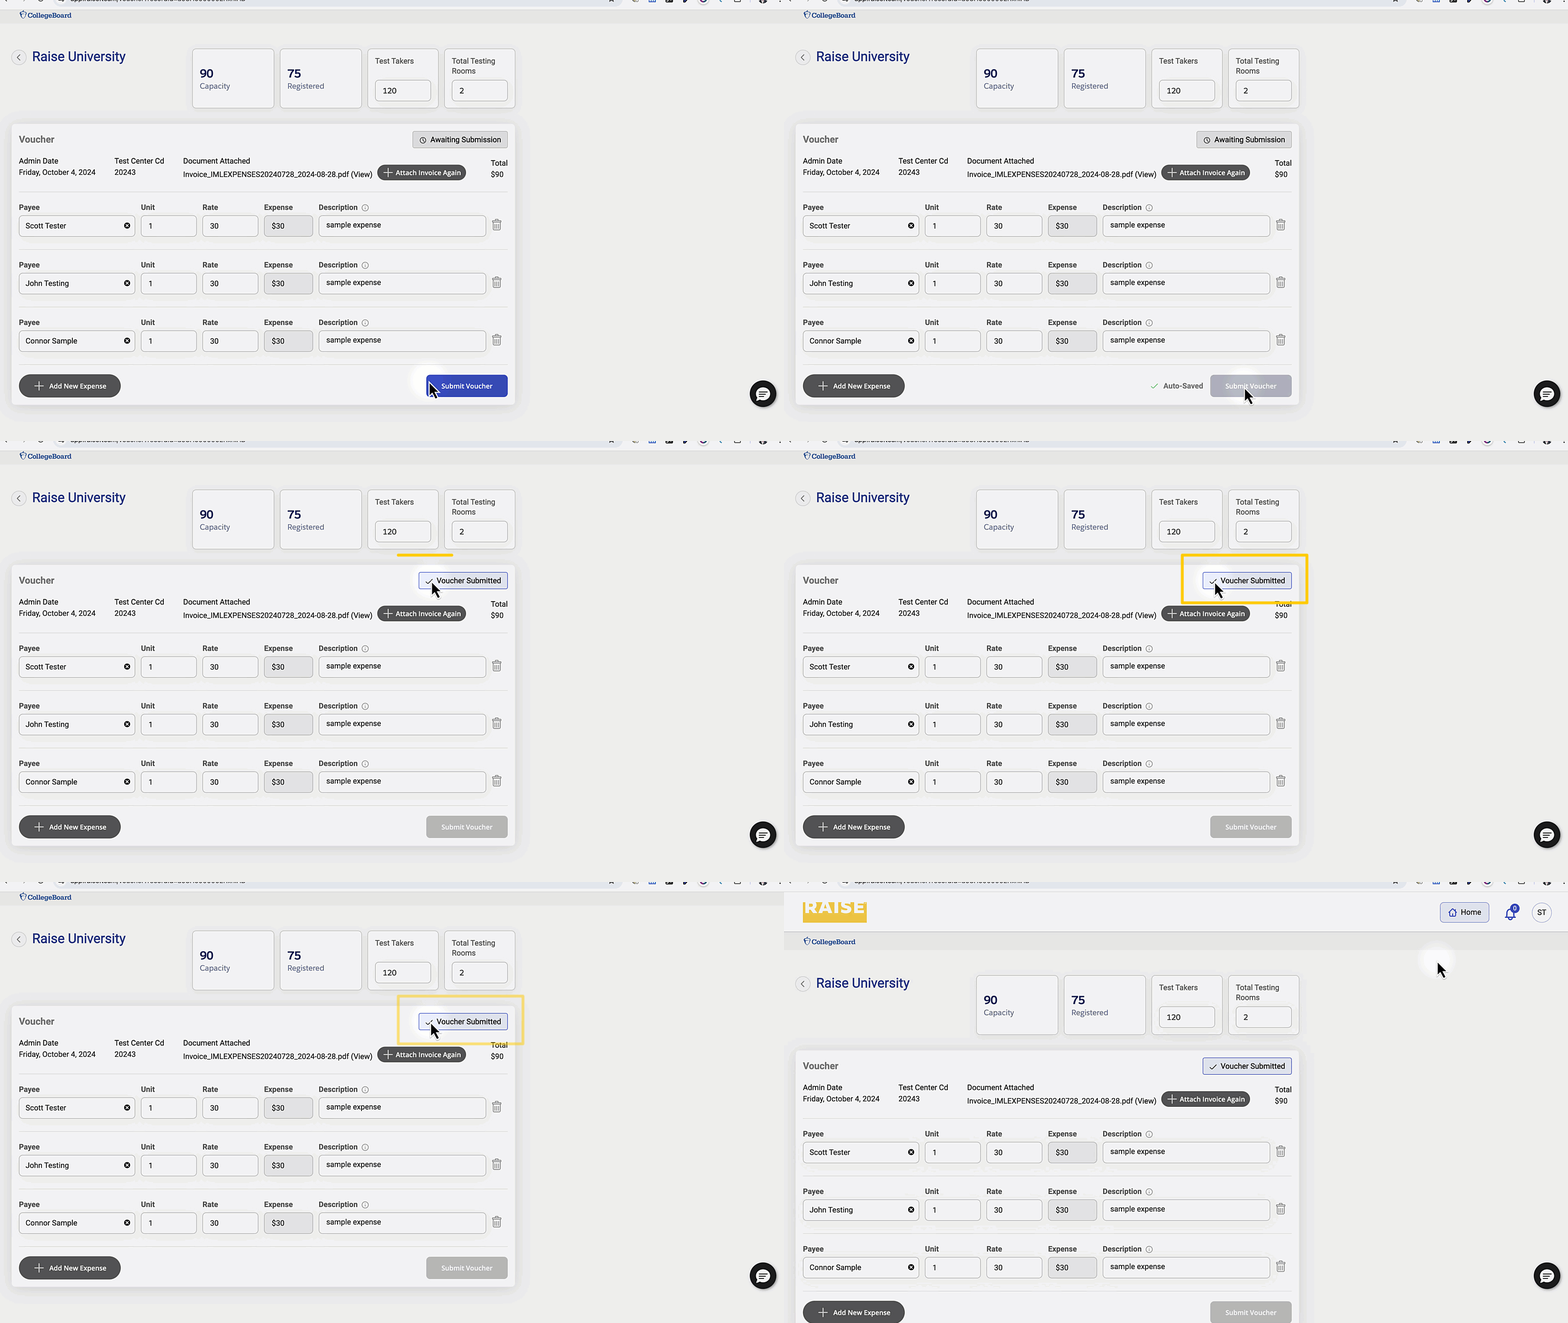
Submit your Invoice and Voucher #
- When you attached your invoice, and completed the information on your voucher, click Submit Voucher.
- When your voucher is submitted, you will see the label reads Voucher Submitted.
- Click the Home button to return to the Dashboard.
- You will again see a label that reads Voucher Submitted.
How to add payment information and submit your invoice if Raise is paying your facility directly #
If Raise will be paying your test center directly (instead of paying your staff directly), turn on the toggle next to My business will be reimbursed.

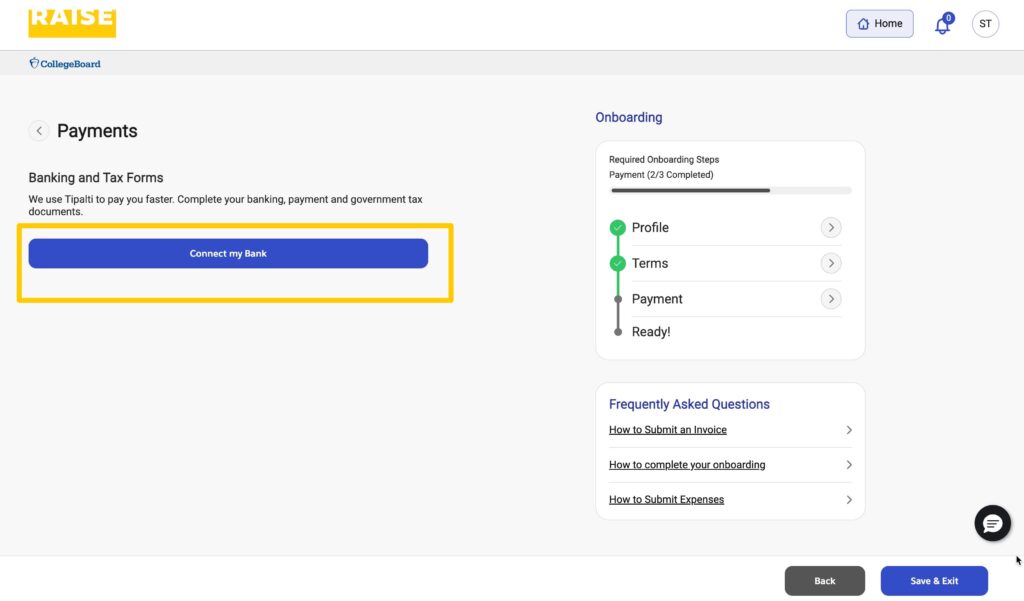
You will need to complete the Payments information and applicable tax forms.
Click Connect My Bank to submit payment and tax information for your facility.
Address
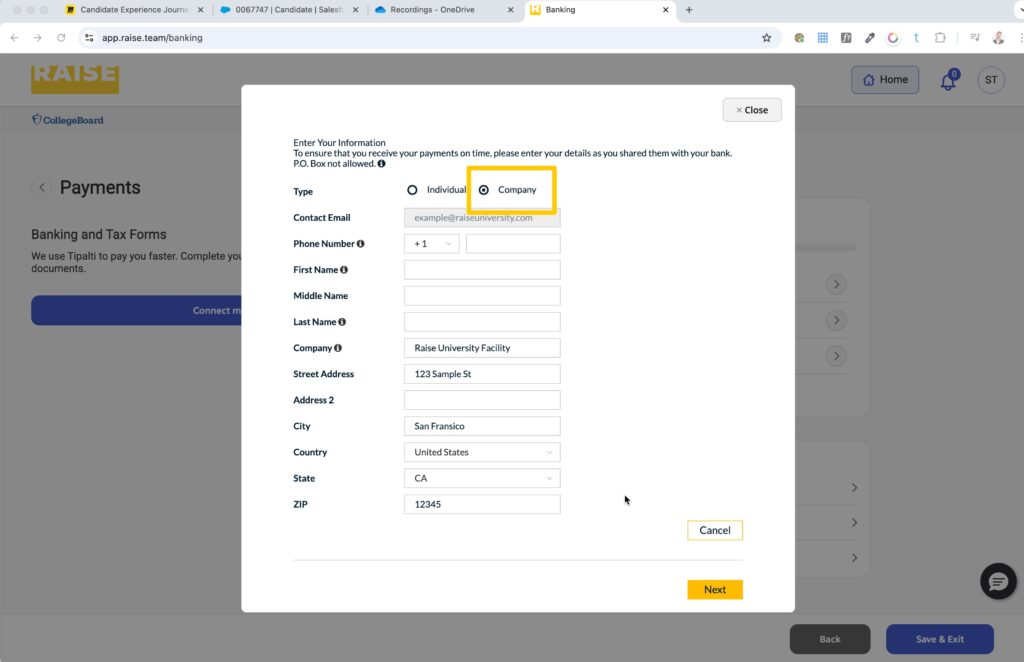
- Make sure that you select Type that you select Company, as Raise will be paying your facility in this case, not an individual.
- Enter the information for you (first name, last name, phone number), and the legal name of your facility in the Company and Address fields. The tax forms later will need to match this legal name exactly.
- For the address, this is where we will mail a check (if you choose that payment option.)
- Click Next.
- You might be asked to confirm the address, confirm and continue.
Payment Method
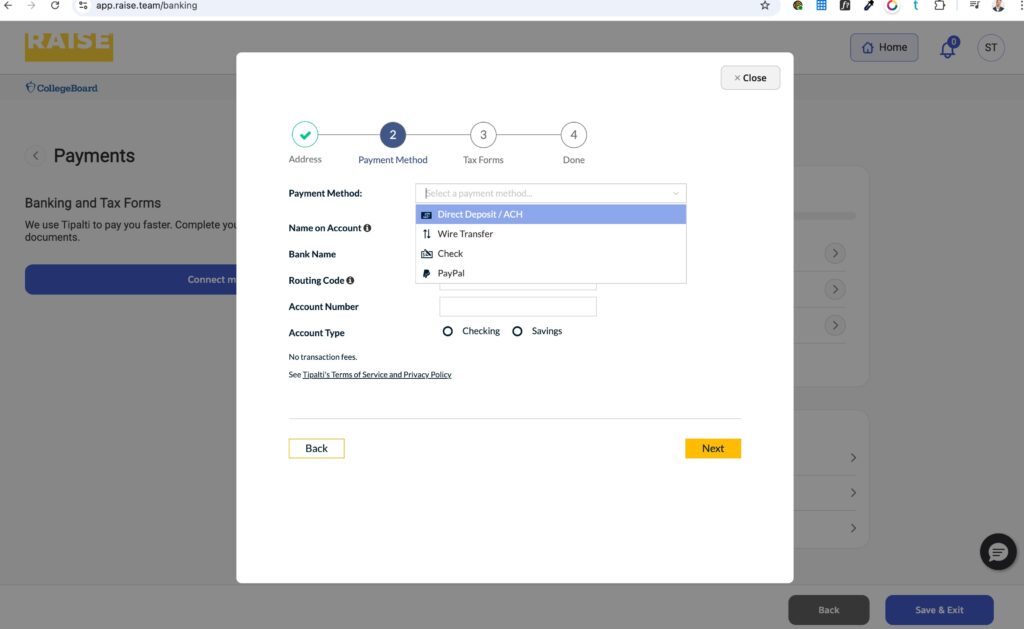
- From the dropdown menu, select a Payment Method.
- These options will change depending on your country and currency.
- Fill in the applicable fields for your payment method (e.g., Account number, SWIFT number, PayPal account, etc.) – please double check that the information is correct to avoid any delays in payments.
- If you choose to have a check mailed to your facility, it will use the address from the previous Address section.
- When you have completed the information for your chosen payment method, click Next.
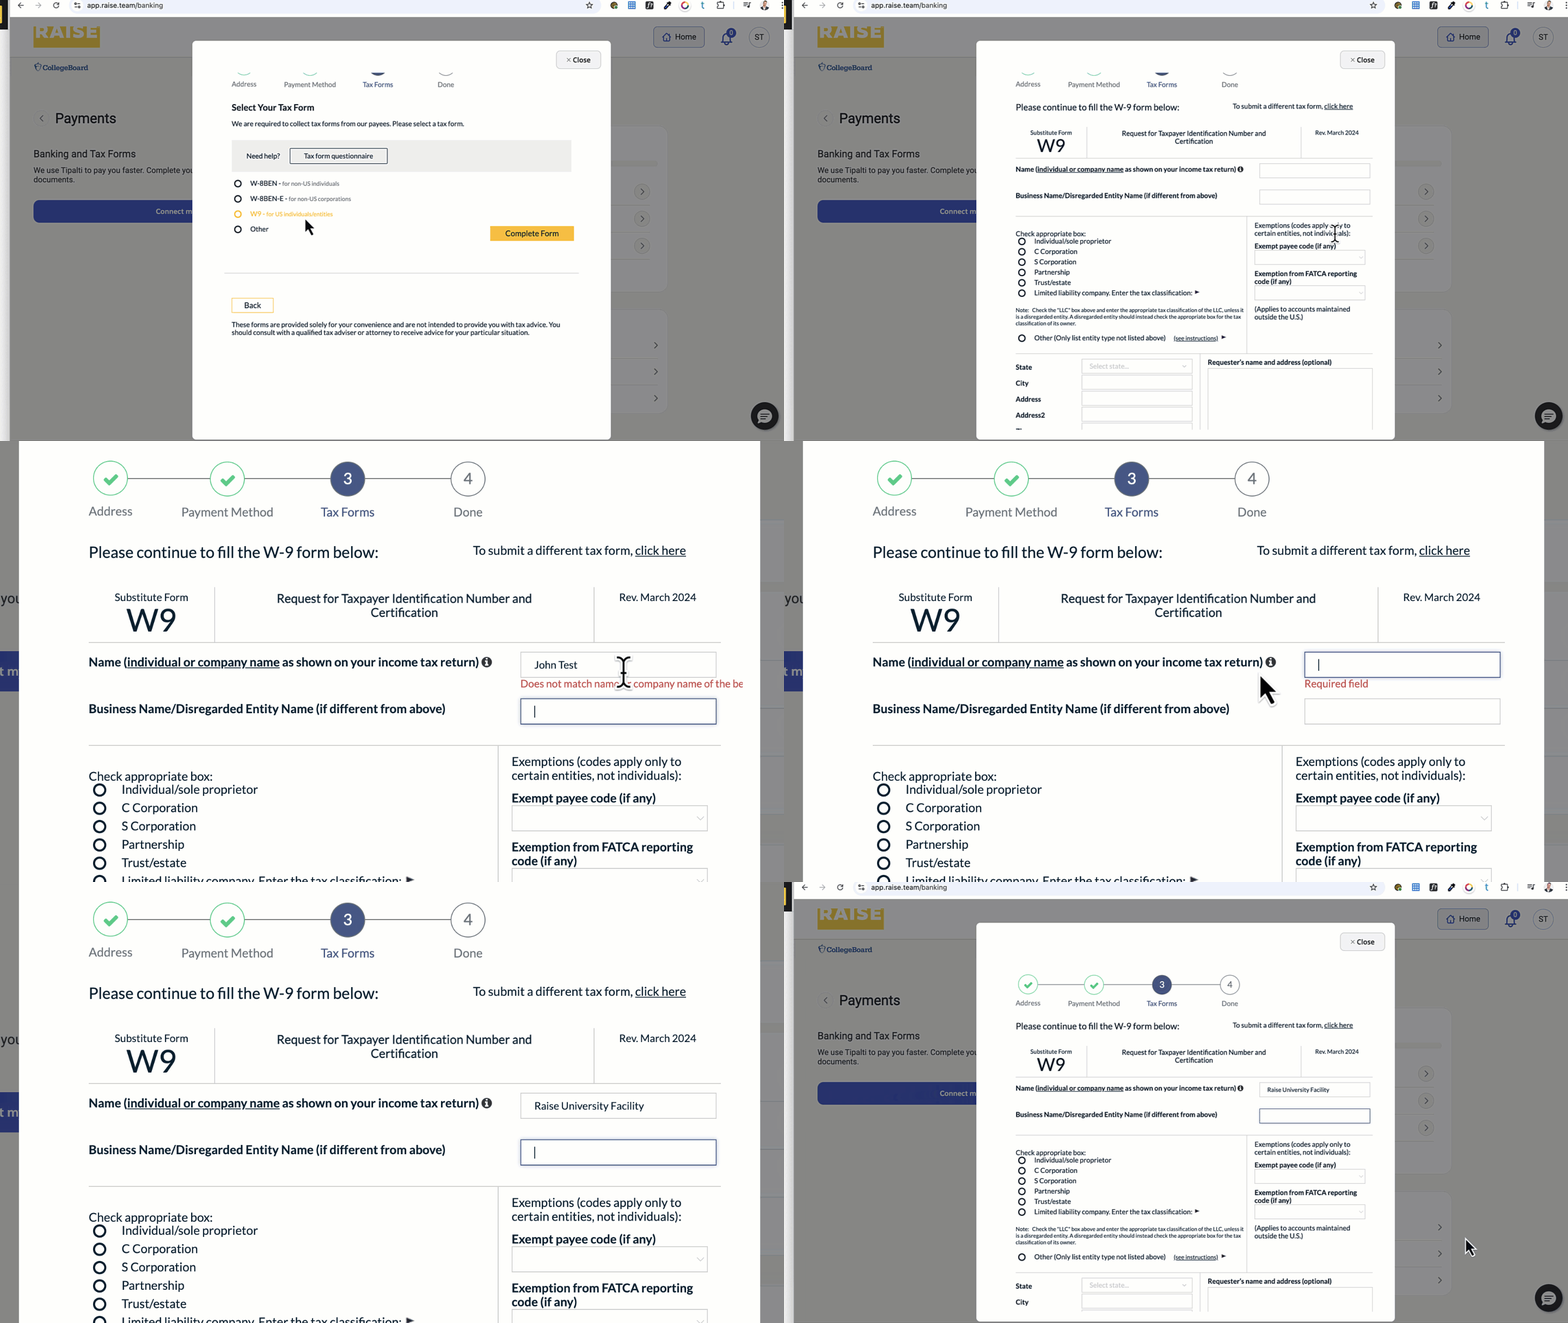
Tax Forms
- Please select the appropriate tax form for your location and your organization.
- If you’re in the United States, you will likely complete the form W9 – for US individuals/entities.
- If you’re outside the United States, it’s more likely that you will complete the W-8BEN-E – for non-US corporations – however, if you have a different arrangement, click Other to see other tax forms to download and complete.
- Click Complete Form.
- Your facility name on the tax form must exactly match the information you provided earlier in the Address section.
- When your form is completed, click Next.
Done
- When you’ve filled out the necessary banking and your tax forms, you’re done! Click Close.
Submit your invoice and voucher #
- Click the green button labeled Attach Invoice.
- Your official invoice must be saved as a PDF, Word Document (DOC, DOCX), PNG or JPG file.
- The official invoice must be on your organization’s letterhead and include:
- The test administration date;
- Your test center number;
- All the charges itemized (e.g., rent, utilities, staff costs, etc.)
- Drag and drop your official invoice on letterhead into the space indicated on the screen, or click Browse to select a file from your computer.
- Click Confirm.
Enter your expense on the voucher #
- The expense amount on the voucher should match the official invoice file you attached.
- If we’re paying your test center directly, please make sure you add either your name or the school’s name as the payee – you don’t need to include the names of individual staff in this case.
Submit your Invoice and Voucher #
- When you attached your invoice, and completed the information on your voucher, click Submit Voucher.
- When your voucher is submitted, you will see the label reads Voucher Submitted.
- Click the Home button to return to the Dashboard.
- You will again see a label that reads Voucher Submitted.